
Ingredients
Method
Step 1: Prepare Your Beets and Gather All Ingredients
- Start by washing 2 medium beets thoroughly under cool running water, scrubbing away any soil with your hands or a vegetable brush. Pat them dry completely with paper towels—this reduces splashing and mess. Using a vegetable peeler or paring knife, remove the thin outer skin. The skin of raw beets can stain permanently, so wear an apron or clothing you don't mind potentially discoloring. Cut the peeled beets into chunks small enough to fit through your food processor's feed tube, or into wedges if using a box grater. Take a moment to measure out all remaining ingredients into small bowls—onion chopped, garlic minced, lentils drained (if using canned, rinse them briefly under cool water to remove excess sodium). This mise en place approach prevents scrambling mid-process and ensures even distribution of seasonings.

Step 2: Grate the Beets
- If your food processor has a shredding disk or grater attachment, this is the ideal moment to use it. Process the beet chunks through the shredding disk directly into the food processor's main bowl—this saves a step and keeps the beets' vibrant color intact. The beets should be uniformly shredded, not mushy or pureed. If you're using a traditional box grater, work over a large mixing bowl, using the medium or large holes. Grate carefully, protecting your fingertips—I recommend stopping when you have about 2 inches of beet remaining, then simply reserving that small piece for another use rather than risking injury. The shredded beets will immediately release moisture, creating a pool of bright magenta liquid in the bottom of your bowl. This is completely normal and desired.

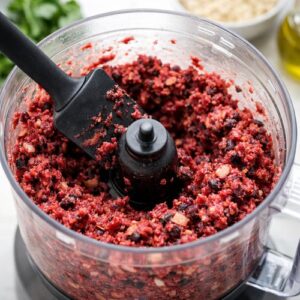
Step 3: Add All Remaining Ingredients to the Food Processor
- Once your beets are shredded, add the rolled oats, cooked lentils, all-purpose flour, chopped onion, minced garlic, peanut butter, dried thyme, salt, and pepper directly to the food processor. Do not add the olive oil at this stage—you'll need it only for cooking. The mixture will look loose and somewhat chaotic at this point, and that's expected.

Step 4: Pulse Until the Mixture Comes Together
- Pulse the mixture 8 to 10 times, stopping to scrape down the sides of the food processor bowl with a rubber spatula after every 2 to 3 pulses. You're looking for a cohesive texture where ingredients are evenly distributed but the mixture still maintains some texture—not a smooth puree. If you over-process, the oats break down completely and create a dense, bread-like consistency that won't cook properly. The finished mixture should resemble thick hummus or coleslaw—it should hold together when you squeeze a handful, but you should still see small flecks of oats and lentil pieces. If the mixture feels too wet and won't hold a shape, add 2 to 3 tablespoons additional flour and pulse once more. If it feels too dry, add 1 to 2 tablespoons of water.
Step 5: Form the Patties
- Turn the mixture out into a bowl and let it rest for 5 minutes. This allows the oats to fully absorb moisture and the mixture to become more cohesive. While waiting, fill a small cup with cool water—this is your "wet hands" station. Divide the mixture into 4 equal portions (roughly 3/4 cup each). Dip your hands into the water cup until they're visibly wet but not dripping. Take one portion and form it gently into a patty approximately 3/4 inch thick and 4 inches in diameter. The key is gentleness—overworking the patty creates density. Re-wet your hands between each patty. Your hands will naturally cool the mixture, which helps with binding. Place finished patties on a parchment-lined plate. Once all four patties are formed, refrigerate them uncovered for at least 30 minutes. This resting period is crucial—it allows the binders to fully set, creating structural integrity. Cold patties are significantly less likely to fall apart during cooking.

Step 6: Cook the Patties
- Heat 1 tablespoon olive oil in a large skillet over medium-high heat. Once the oil is shimmering (approximately 30 to 45 seconds), carefully place 2 patties in the pan, leaving space between them. Do not move them for the first 4 to 5 minutes—this allows the exterior to develop a golden crust and firm up, which prevents falling apart. After 4 to 5 minutes, peek underneath using a thin spatula. The bottom should be deep golden brown, almost mahogany-colored. Flip carefully and cook the second side for another 3 to 4 minutes until similarly browned and crispy. Remove to a plate and repeat with remaining patties, adding another 1 tablespoon oil to the pan.

Notes
- Using instant or quick oats instead of large-flake rolled oats—Instant oats break down during processing and create a mushy, dense patty that lacks structure. Large-flake oats maintain their integrity and create that satisfying chewy texture. Always check the package label.
- Squeezing excess moisture from the shredded beets—I see this constantly with clients who've made dry, mealy burgers elsewhere. The water content in beets is necessary for moisture and tenderness. Trust the process. The binding ingredients will manage it.
- Over-processing the mixture into a puree—This creates a dense, heavy burger that tastes more like a veggie loaf than a burger. You want visible texture. Stop when you still see small flecks of ingredients.
- Cooking patties straight from the mixing bowl without chilling—Warm patties lack structural integrity and fall apart easily. The refrigeration step is non-negotiable for success.